Step 5
Starting with React
What is React?
React is a view rendering library developed and actively maintained by a team of engineers at Facebook. I feel that first of all it is helpful to clear up a common misconception about what React isn't, rather than what it is.
React is not a framework but rather a library for developing user interfaces. The React library does not come with routing, "models" or data management, network request helpers, or even a test suite.
Since React has a large community around it there are however many libraries
that you can plug into your application that provide these features to you as a
developer in a "React way". For example,
React Router for navigation or
Redux for managing data. To make a network request you
don't add something like jQuery you just use the browsers native fetch 1
method.
So, what exactly is React then?
The best explanation would come directly from Facebook: 2
Declarative
React makes it painless to create interactive UIs. Design simple views for each state in your application, and React will efficiently update and render just the right components when your data changes. Declarative views make your code more predictable and easier to debug.
Component-Based
Build encapsulated components that manage their own state, then compose them to make complex UIs. Since component logic is written in JavaScript instead of templates, you can easily pass rich data through your app and keep state out of the DOM.
Learn Once, Write Anywhere
We don’t make assumptions about the rest of your technology stack, so you can develop new features in React without rewriting existing code. React can also render on the server using Node and power mobile apps using React Native.
Live updates / renders
Each React component has a render method that defines which DOM will be
returned when the component is rendered to the screen. As the Facebook
explanation states, React only updates the parts of your DOM that have changes
attached. It does this by using a virtual DOM to diff the current DOM in the
browser, calculating what needs to change, and only changing those parts.
React understands what will change by looking at state and props. React
components can have internal state which when changed causes a re-render of
the component. props are basically like HTML attributes, such as href for an
<a> tag. State can be passed down to child components via props and when these
change a re-render can also be triggered.
This means that React component can update to live changes. For an example see the Markdown example on the React.js homepage.
What is JSX?
As mentioned in previous steps of this tutorial, React has a special syntax called JSX. JSX is an "XML-Like Syntax for JavaScript". 3
Although it is possible to write React components without JSX, using vanilla JavaScript, it is most common to use the JSX syntax. JSX can look very strange if you have never worked with it before however it starts to feel very natural after a little experience.
Let's take an example of a JSX React component and see what it would compile
down to. All JSX scripts should have a .jsx extension in order to
differentiate from standard JavaScript.
// HelloMessage.jsx

class HelloMessage extends React.Component {
  render() {
    return <h1>Hello {this.props.name}</h1>;
  }
}

<HelloMessage name="Ned Stark" />;
This is a simple example but you can already see some of the fundamentals of
React. We have an ES6 class, extending the methods from the React.Component
class. We have the render method which returns the DOM that the component
should build. The JSX is an <h1> tag which as you can imagine is the same as
an <h1> in regular HTML. We then interpolate a dynamic variable into the
content of the H1, this.props.name. As can be seen on the final line, you pass
the name prop to the component the same way as an attribute in HTML.
The final output rendered to the web page would be:
<h1>Hello Ned Stark</h1>
As I mentioned earlier, you do not necessarily have to write React in JSX syntax. The previous code sample would compile down to:
class HelloMessage extends React.Component {
  render() {
    return React.createElement('h1', null, 'Hello ', this.props.name);
  }
}

ReactDOM.render(
  React.createElement(HelloMessage, { name: 'Ned Stark' }),
  mountNode
);
Although this vanilla JS may look a little more natural, using JSX allows you to work with the DOM and your logic in the same file. Even though it can feel like "going backwards" against the standards you have learned in the past, having the templating language alongside your logic directly in the JavaScript allows you to keep all logic in one place.
For example, when using jQuery, you can bind click handlers from any file.
Suddenly when clicking on the page JavaScript logic is taking place but it can
be tricky to find out in which file that logic was defined. Somtimes the click
handlers override each other if defined multiple times in multiple files. When
working with a React component you know the logic will be within the Component
that you are working with, making your life as a developer easier.
Writing our first Component
Now that we have a better understanding of React Components let's implement our first one in the tutorial project.
We will start by installing the react dependency.
yarn add react
Next we will create a directory for our components and a directory for you main
<App /> component that we are about to build.
Notice that custom React components always start with a capital letter and are
camel cased e.g. <MyComponent />. This allows us to differentiate between
React components and normal HTML tags, for example <span>, or <a>.
Start by creating the "App" directory inside of a "components" directory.
mkdir app/js/components
mkdir app/js/components/App
We can now create our "App" component in this directory by creating a file
called App.jsx. We will start by importing React and Component into the
file.
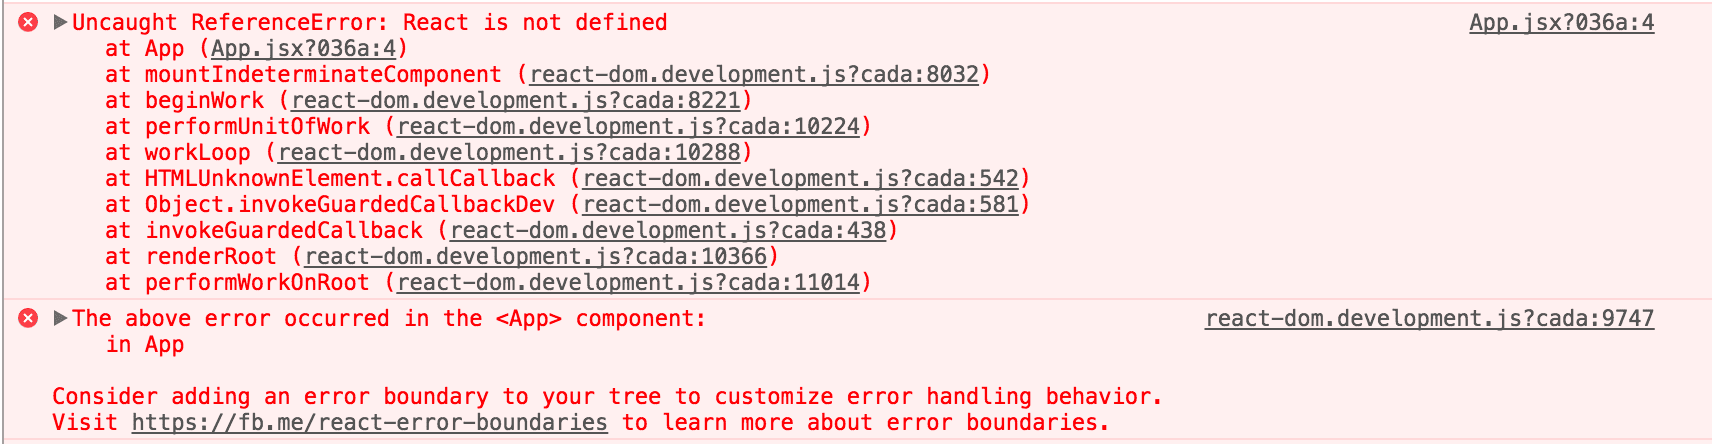
Note: Whenever you use JSX in a file, you must import React even if you do not
use the variable directly, otherwise the component will not compile and you will
see the following console error:
// app/js/components/App/App.jsx

import React, { Component } from 'react';
Next we will create a class called App, extended from Component, that has a
render method.
// app/js/components/App/App.jsx

import React, { Component } from 'react';

class App extends Component {
  render() {}
}
We can now specify the content that we want to render on the web page.
// app/js/components/App/App.jsx

import React, { Component } from 'react';

class App extends Component {
  render() {
    return <p>Rendered by React</p>;
  }
}
Finally we will specify that App is the default export for this JavaScript
module.
// app/js/components/App/App.jsx

import React, { Component } from 'react';

class App extends Component {
  render() {
    return <p>Rendered by React</p>;
  }
}

export default App;
Managing imports
When importing from JavaScript modules the file index.js will automatically be
loaded if no filename is specified in the import in the file path. i.e.import components/App; is the same as import components/App/index;
For this reason we will always define an index.js file that is responsible for
exporting the classes and functions defined within out component files.
To do this we create an index.js file in our "App" directory and export the
default component from there.
// app/js/components/App/index.js

export { default } from './App';
Render the app with React DOM
React DOM is responsible for selecting the DOM node that will contain the React
application and rendering the compiled DOM contents of our <App /> component
into it. First of all add the package via yarn.
yarn add react-dom
Finally we will update our application.js file to import the render method
from react-dom, import our <App /> component, select the #app div that we
have already added to our index.html file and glue it all together.
// app/js/application.js

import React from 'react';
import { render } from 'react-dom';

import App from './components/App';

render(<App />, document.getElementById('app'));
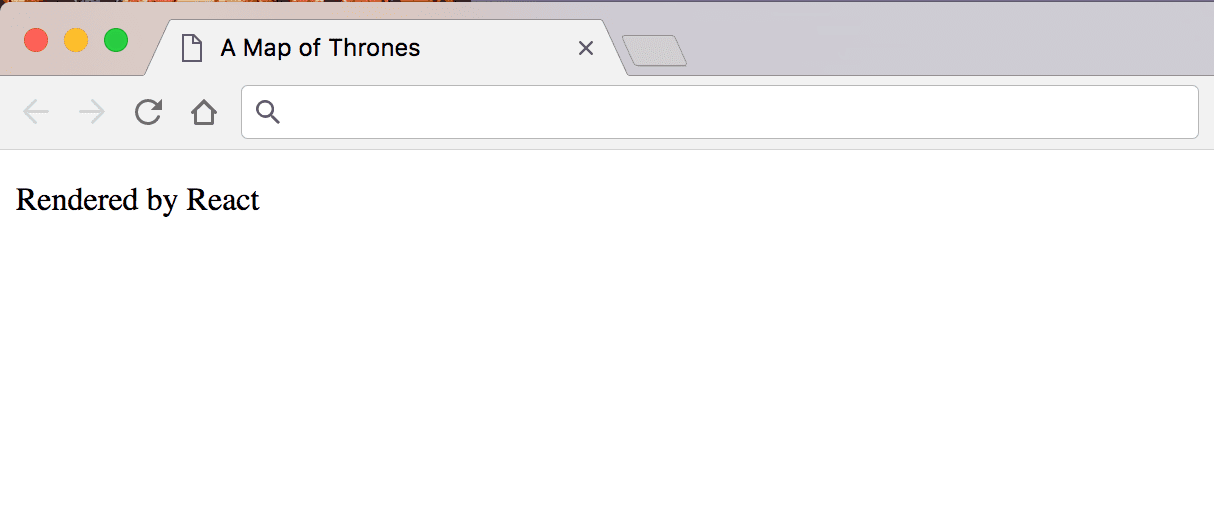
Build the bundled JavaScript again by running yarn dev and open index.html
in your browser to see "Rendered by React" in a paragraph tag on the page.
Stateless Functional Components
Finally we can clean our App component up a little. Since React 14 4 we no
longer necessarily need to import Component and use a class for a React
component. If the component does not need to use internal state or lifecycle
methods (such as componentWillMount, componentDidMount, etc.) you can simply
use a function that returns the JSX content. Let's refactor the <App />
component to see an example.
This is called a "stateless functional component" (SFC) because the component
will never have an internal state and the component is expressed as a simple
function instead of a class.
// app/js/components/App/App.jsx

import React from 'react';

const App = () => {
  return <p>Rendered by React</p>;
};

export default App;
Run yarn build again and refresh index.html and you will see the content of
the browser are still the same.